CentOS 6.2我是最小化安装,同时使用163的源进行update,所以还需要安装如下的依赖包:
[[email protected] ~]$ sudo yum install gcc make pcre pcre-devel libpcap libpcap-devel
同时需要关闭iptables、ip6tables:
[[email protected] ~]$ sudo service iptables stop
[[email protected] ~]$ sudo service ip6tables stop
[[email protected] ~]$ sudo chkconfig --level 2345 iptables off
[[email protected] ~]$ sudo chkconfig --level 2345 ip6tables off
需要下载的软件:
Suricata
http://www.openinfosecfoundation.org/index.php/downloads
Barnyard 2
http://www.securixlive.com/barnyard2/
Base
http://base.secureideas.net/
yaml
http://pyyaml.org/
adodb
http://sourceforge.net/projects/adodb/
rules
http://rules.emergingthreats.net/open/suricata/emerging.rules.tar.gz
Image_Canvas
http://download.pear.php.net/package/Image_Canvas-0.3.3.tgz
Image_Graph
http://download.pear.php.net/package/Image_Graph-0.8.0.tgz
Base需要APM(Apache、PHP、Mysql)环境,通过yum来进行安装。
[[email protected] ids]$ sudo yum install httpd php mysql mysql-server mysql-devel php-mysql php-gd php-pear
启动httpd、mysql服务
[[email protected] ids]$ sudo /etc/init.d/httpd start
[[email protected] ids]$ sudo /etc/init.d/mysqld start
默认的web根目录是/var/www/html,在此目录新建phpinfo测试文件,来确认配置是否正确。
PS:mysql安装后root账号默认口令为空,通过下面命令可以修改root账号口令
[[email protected] ~]$ mysqladmin -uroot -p password [新密码]
安装过程如下:
[[email protected] ids]$ tar zxvf barnyard2-1.9.tar.gz
[[email protected] ids]$ cd barnyard2-1.9
[[email protected] barnyard2-1.9]$ ./configure --with-mysql
[[email protected] barnyard2-1.9]$ make
[[email protected] barnyard2-1.9]$ sudo make install
安装过程如下:
Suricata需要依赖yaml,首先安装yaml
[[email protected] ids]$ tar zxvf yaml-0.1.4.tar.gz
[[email protected] ids]$ cd yaml-0.1.4
[[email protected] yaml-0.1.4]$ ./configure
[[email protected] yaml-0.1.4]$ make
[[email protected] yaml-0.1.4]$ sudo make install
[[email protected] ids]$ tar zxvf suricata-1.1.1.tar.gz
[[email protected] ids]$ cd suricata-1.1.1
[[email protected] suricata-1.1.1]$ ./configure
[[email protected] suricata-1.1.1]$ make
[[email protected] suricata-1.1.1]$ sudo make install
把Barnyard 2安装源文件中的etc/barnyard2.conf文件拷贝到Suricata的配置目录下
[[email protected] ids]$ cd barnyard2-1.9
[[email protected] barnyard2-1.9]$ sudo cp etc/barnyard2.conf /etc/suricata/
创建barnyard2日志目录/var/log/barnyard2
[[email protected] ~]$ sudo mkdir /var/log/barnyard2
需要创建数据库和相应的账号
[[email protected] ~]$ mysql -uroot –p
mysql> create database ids;
mysql> grant create,select,update,insert,delete on ids.* to [email protected] identified by 'ids123';
Barnyard 2安装源文件中的schemas/create_mysql是创建表的sql文件,通过如下方式建表:
[[email protected] ~]$ mysql -uids -p -Dids < ids/barnyard2-1.9/schemas/create_mysql
创建Suricata配置目录和日志目录
[[email protected] ~]$ sudo mkdir /var/log/suricata
[[email protected] ~]$ sudo mkdir /etc/suricata
把规则文件拷贝到Suricata配置目录下
[[email protected] ids]$ tar zxvf emerging.rules.tar.gz
[[email protected] ids]$ sudo cp -R rules/ /etc/suricata/
把Suricata安装源文件中的suricata.yaml/classification.config/reference.config文件拷贝到Suricata的配置目录下
[[email protected] ids]$ cd suricata-1.1.1
[[email protected] suricata-1.1.1]$ sudo cp suricata.yaml classification.config reference.config /etc/suricata/
编辑barnyard2.conf文件
[[email protected] ~]$ cd /etc/suricata/
[[email protected] suricata]$ sudo vim barnyard2.conf
找到下面的内容
config reference_file:      /etc/snort/reference.config
config classification_file: /etc/snort/classification.config
config gen_file:            /etc/snort/gen-msg.map
config sid_file:                /etc/snort/sid-msg.map
更改为的内容如下:
config reference_file:      /etc/suricata/reference.config
config classification_file: /etc/suricata/classification.config
config gen_file:            /etc/suricata/rules/gen-msg.map
config sid_file:            /etc/suricata/rules/sid-msg.map
同时在文件的末尾添加如下行,红色的mysql数据库、账号信息根据实际情况填写
output database: log, mysql, user=ids password=ids123 dbname=ids host=localhost
编辑suricata.yaml文件
[[email protected] suricata]$ sudo vim suricata.yaml
找到
HOME_NET: "[192.168.0.0/16,10.0.0.0/8,172.16.0.0/12]"
这一行,根据实际的网络情况来修改,在这里我修改为
HOME_NET: "[192.168.0.0/16]"
找到下面的内容:
host-os-policy:
  # Make the default policy windows.
  windows: [0.0.0.0/0]
  bsd: []
  bsd_right: []
  old_linux: []
  linux: [10.0.0.0/8, 192.168.1.100, "8762:2352:6241:7245:E000:0000:0000:0000"]
  old_solaris: []
  solaris: ["::1"]
  hpux10: []
  hpux11: []
  irix: []
  macos: []
  vista: []
  windows2k3: []
根据实际网络情况修改。
启动Suricata、Barnyard 2
[[email protected] ~]$ sudo /usr/local/bin/barnyard2 -c /etc/suricata/barnyard2.conf -d /var/log/suricata -f unified2.alert -w /var/log/suricata/suricata.waldo -D
[[email protected] ~]$ sudo /usr/local/bin/suricata -c /etc/suricata/suricata.yaml -i eth1 -D
启动suricata的-i参数是镜像流量的网卡。
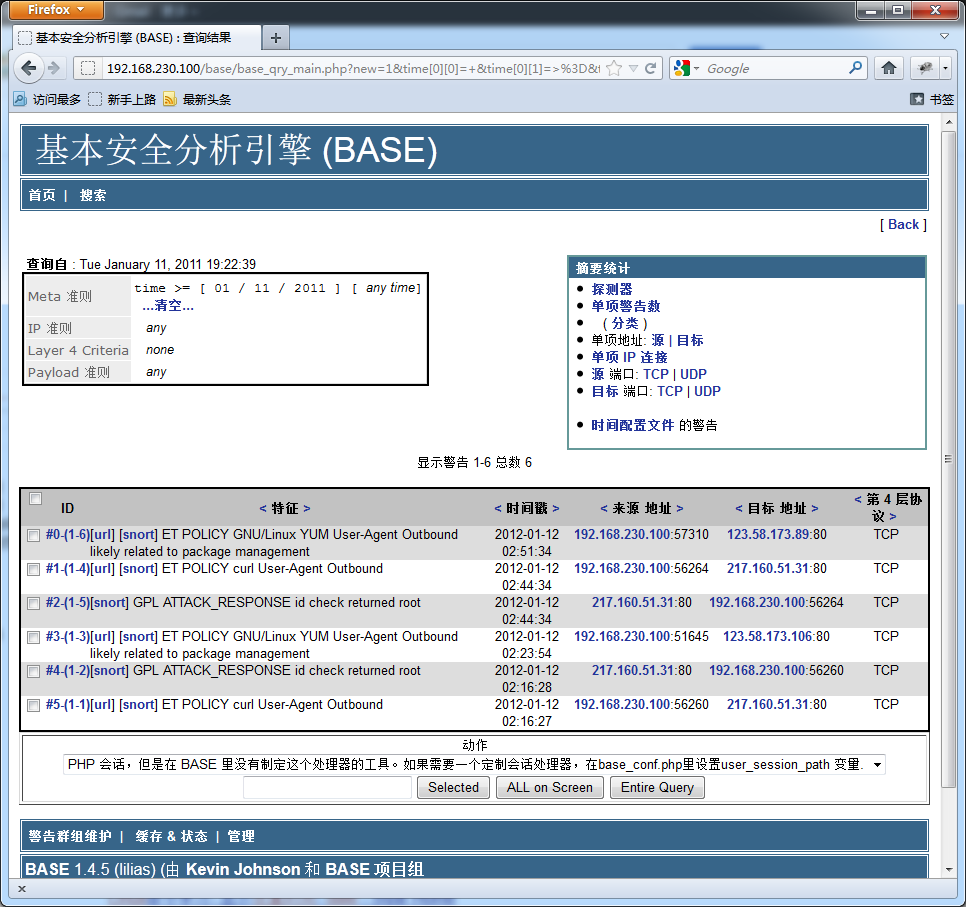
测试suricata工作是否正常,可以通过如下命令:
[[email protected] suricata]$ curl www.testmyids.com
执行后,/var/log/suricata目录下的fast.log/suricata.waldo/unified2.alert*文件大小发生变化,同时查看fast.log文件有如下类似的内容则表示suricata工作正常:
01/12/2012-02:16:27.964981  [**] [1:2013028:3] ET POLICY curl User-Agent Outbound [**] [Classification: Attempted Informa
tion Leak] [Priority: 2] {TCP} 192.168.230.100:56260 -> 217.160.51.31:80
01/12/2012-02:16:28.309707  [**] [1:2100498:7] GPL ATTACK_RESPONSE id check returned root [**] [Classification: Potential
ly Bad Traffic] [Priority: 2] {TCP} 217.160.51.31:80 -> 192.168.230.100:56260
Base需要用到adodb以及Image_Canvas、Image_Graph绘图组件,配置过程如下:
解压adodb514.zip
[[email protected] ids]$ unzip adodb514.zip
把adodb5拷贝到/usr/local/lib/目录下,这个目录随意指定,记下来后面要用到
[[email protected] ids]$ sudo cp -R adodb5 /usr/local/lib/
安装Image_Canvas、Image_Graph
[[email protected] ids]$ sudo pear install Image_Canvas-0.3.3.tgz
[[email protected] ids]$ sudo pear install Image_Graph-0.8.0.tgz
解压base-1.4.5.tar.gz
[[email protected] ids]$ tar zxvf base-1.4.5.tar.gz
拷贝base-1.4.5到/var/www/html目录下
[[email protected] ids]$ sudo cp -R base-1.4.5 /var/www/html/base
更改/var/www/html/base的属主为apache
[[email protected] ids]$ cd /var/www/html/
[[email protected] html]$ sudo chown -R apache:apache base
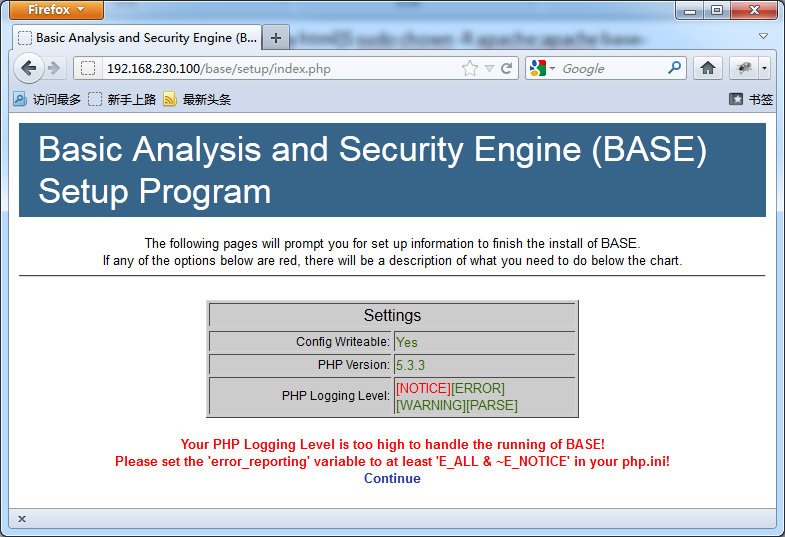
然后通过浏览器访问http://192.168.230.100/base

根据页面中红色的部分提示来进行操作。
修改php.ini
[[email protected] html]$ sudo vim /etc/php.ini
找到
error_reporting = E_ALL & ~E_DEPRECATED
内容,修改为如下:
error_reporting = E_ALL & ~E_DEPRECATED & ~E_NOTICE
重新载入apache配置
[[email protected] html]$ sudo /etc/init.d/httpd reload
然后点击“Continue”到下一步  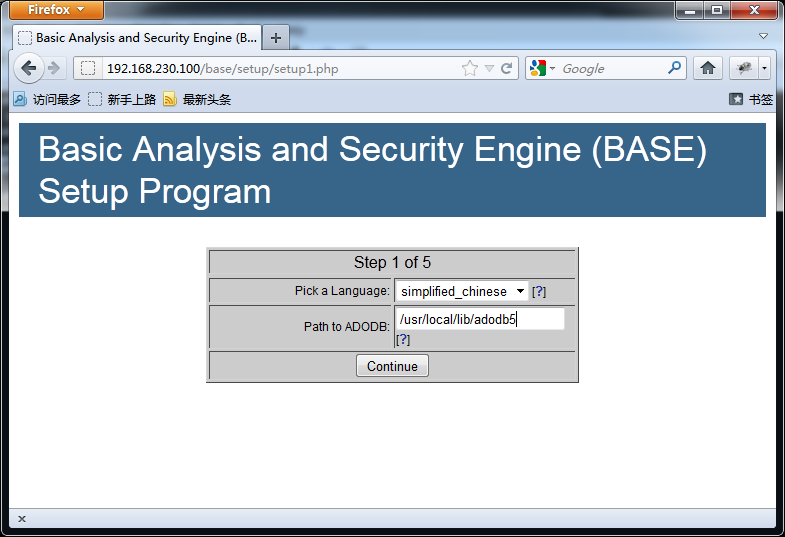
选择语言,和前面我们的adodb5的路径,然后点击“Continue”  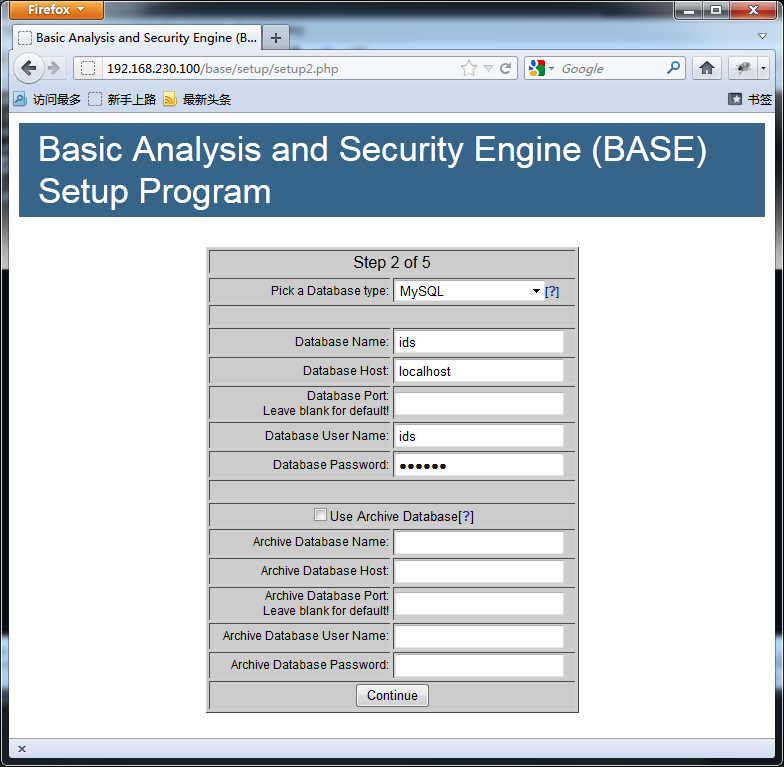
填写mysql相关信息,点击“Continue”继续  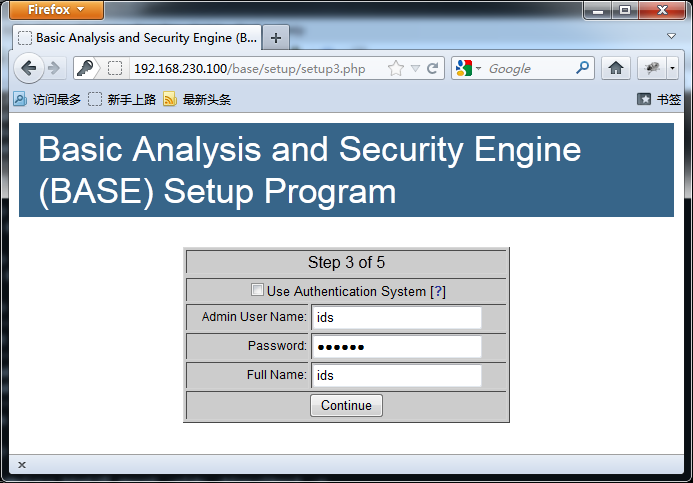
填写认证的相关信息,如果需要验证身份,请勾上“Use Authentication System”,点击“Continue”  
点击“Create BASE AG”  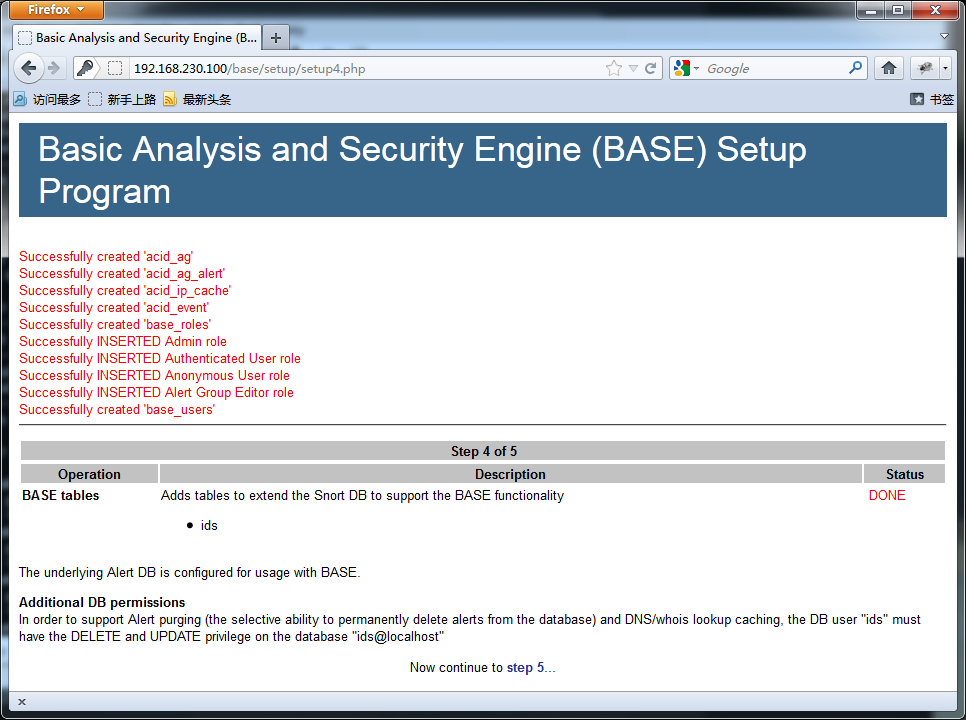
点击“step 5”,跳到首页。

以上是整个安装过程,IDS的价值在于规则设置的是否合适,根据实际情况设置合适的规则才能够体现IDS的强大。规则的设置见以后的文章。